How to Create Classifications for Microsoft Teams in Azure (and Automate Them with Teams Manager)

Why do you need classifications in Microsoft Teams?
When organizations grow, so does the number of Teams. Without proper labeling, it quickly becomes unclear which Teams contain confidential data, which are for internal use, and which are public.
This lack of structure leads to governance risks, compliance issues and unnecessary administrative effort.
Microsoft Teams classifications solve this by allowing you to assign categories like Confidential, Internal or Public to each Team. These classifications help users understand data sensitivity at a glance and enable admins to apply governance policies.
In this guide, you’ll learn step by step how to create classifications for Microsoft Teams in Azure, and how Teams Manager helps you automate this process for consistent, compliant team management.
What are Microsoft Teams classifications?
Classifications in Microsoft Teams are labels that define the sensitivity or intended use of a Team from a data security point-of-view.
They are stored in Entra ID (Azure Active Directory) and can be applied to any Team in your Microsoft 365 environment.
Examples of common classifications:
- Confidential: For internal use only, restricted to specific departments.
- Internal: For general company communication.
- Public: Accessible for broader collaboration or cross-departmental projects.
The labels appear in the upper right corner of the Team:

By setting up these categories centrally, you ensure that all Teams are created and used according to your company’s compliance and data protection policies.
Find out in this blogpost how you can create classifications for MS Teams in Azure, or check out Teams Manager and let it do the work for you!

How to create Azure Classifications for Microsoft Teams
Time needed: 5 minutes
To create classifications, you will use PowerShell commands in your Azure Active Directory environment.
- Create classification in Microsoft Azure
In order to use classifications in MS Teams, they must first be created in Microsoft Azure via PowerShell. The names and descriptions of the classifications can be adapted to your needs. This example creates four classifications: Public, Internal, Restricted and Confidential.
You can modify this in the script below to include your own labels according to your governance requirements.Install-Module AzureADPreview
Connect-AzureAD
Get-AzureADDirectorySettingTemplate
$Template = Get-AzureADDirectorySettingTemplate | ? {$_.Displayname -eq "Group.Unified"}
$TemplateSettings = $Template.CreateDirectorySetting()
$TemplateSettings["ClassificationList"] = "Confidential,Restricted,Internal Use,Public"
$TemplateSettings["ClassificationDescriptions"] = "Confidential:High business impact. Normally accessible only to specified members,Restricted:Normally accessible only to specified and/or relevant members,Internal Use:Normally accessible to all employees,Public:Accessible to all members of the public"
$TemplateSettings["DefaultClassification"] = "Internal Use"
New-AzureADDirectorySetting -DirectorySetting $TemplateSettings - Classifications are now created and available
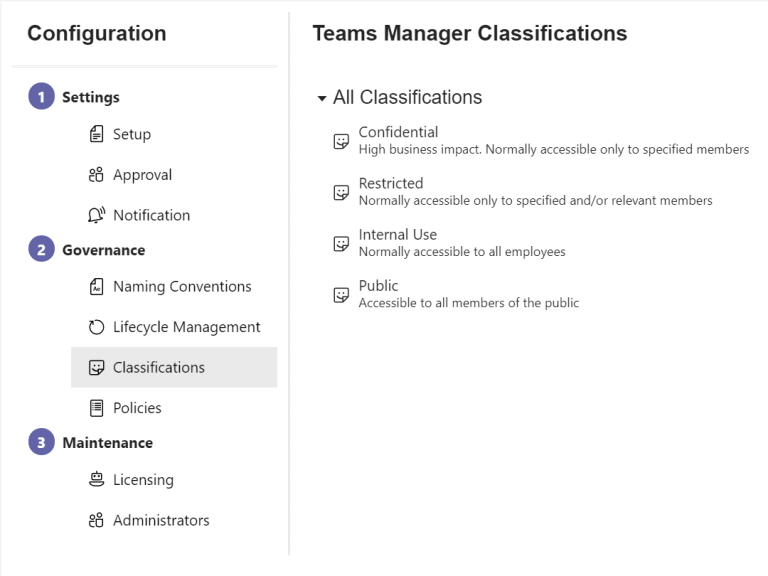
After successful execution of the script the classifications are created and available in the Teams Manager settings in Microsoft Teams.

- If script fails, first execute the following script
If the script fails, it is presumably because there already exists a script.
In this case, first execute the following script and then create the classifications according to the script above.$Setting = Get-AzureADDirectorySetting | ? { $_.DisplayName -eq "Group.Unified"}
$Setting["ClassificationList"] = "Confidential,Restricted,Internal Use,Public"
$Setting["ClassificationDescriptions"] = "Confidential:High business impact. Normally accessible only to specified members,Restricted:Normally accessible only to specified and/or relevant members,Internal Use:Normally accessible to all employees,Public:Accessible to all members of the public"
$Setting["DefaultClassification"] = "Internal Use"
Set-AzureADDirectorySetting -Id $Setting.Id -DirectorySetting $Setting - You can now use your classifications when creating teams
Once the script has been executed successfully, your new classification labels are available in Azure AD. They can now be used when creating new Teams directly in Microsoft Teams and are also available in Teams Manager to automatically assign during team creation.
What happens after you create classifications?
After running the script, the classification labels are immediately available to all users in your tenant.
When users create new Teams, they can select the appropriate classification label.
This ensures:
- Consistent labeling across your entire organization.
- Clear communication of data sensitivity levels.
- Simplified governance and auditing for IT administrators.
How can Teams Manager help automate and enforce classifications?
While Microsoft provides basic classification functionality, Teams Manager extends it with automation and governance features that simplify administration and reduce manual errors.
With Teams Manager, you can:
- Automatically assign classifications to Teams based on templates or metadata.
- Enforce mandatory classification during Team creation.
- Combine classifications with naming conventions.
- Monitor all Teams and their classifications in a central dashboard.
- Automatically archive or restrict Teams based on classification level.
- Control guest access to Teams based on classifications.
This means you don’t just set up classifications. You manage and enforce them as part of a complete Teams governance strategy.
Example use case: How an IT department gained control with automated classifications
A global IT services company struggled with over 800 Teams. Many lacked clear labels, causing confusion about which contained sensitive data.
By setting up Azure classifications and implementing Teams Manager, they:
- Automatically tagged new Teams with “Confidential” or “Internal” labels.
- Prevented users from skipping classifications during creation.
- Deactivated guest access for high-sensitivity Teams.
The result: better data transparency, stronger compliance, and 60 % less manual admin effort.
FAQ: Microsoft Teams classifications in Azure
Do I need admin rights to create classifications?
Yes, you need Entra ID / Azure AD administrator permissions to create or modify directory settings.
Can I update or delete classifications later?
Yes, classifications can be edited or removed anytime using the same PowerShell commands.
Are classifications visible to all users?
Yes, once created, they appear in the Team creation dialog across your entire tenant.
Can I automate classifications without PowerShell?
Not natively in Microsoft Teams. But Teams Manager allows you to apply and enforce classifications automatically, without scripting.
Can I restrict access based on classifications?
Yes, by integrating Microsoft Purview or other governance tools, you can apply access and retention policies based on classification levels. Or you use Teams Manager to control guest access.
Why use Teams Manager for managing classifications?
Microsoft’s built-in classifications are a good place to start.
But without automation, synchronization, and governance enforcement, admins often face …
- Inconsistent labeling
- Missed classifications during Team creation
- Lack of reporting and lifecycle control
Teams Manager solves these challenges by integrating classification logic directly into your Teams governance processes.
This ensures every Team is correctly labeled, approved, and maintained; with full visibility for IT and compliance teams.
Request a free demo to see how Teams Manager simplifies Microsoft Teams classification, governance, and lifecycle management!

Chief Commercial Officer and Governance Specialist at Solutions2Share
Florian Pflanz has more than 8 years of experience with Microsoft 365 and has supported over 250 workshops on Teams governance.
His focus lies on lifecycle management, provisioning, and compliance requirements in regulated industries.
He shares best practices with IT admins and decision-makers to reduce complexity and strengthen secure collaboration in Teams.