How to Manage Teams in Microsoft Teams Admin Center (2023 Tutorial)
The Microsoft Teams Admin Center is a web-based portal that allows administrators to manage and control the various aspects of their Microsoft Teams environment. It is designed to be used by IT professionals and administrators who need to manage Teams within their organization.
In this blog post, we will answer the most important questions about the Microsoft Teams Admin Center and give an overview of its features.
In order to access and login to the Teams Admin Center, visit https://admin.teams.microsoft.com/.
Or try an easy-to-use Teams admin tool for free!

What is the Microsoft Teams Admin Center?
The Teams Admin Center is a part of Microsoft’s complex set of settings, security and permissions, specifically for Microsoft Teams. We’ve already mentioned it in several of our blogposts concerning Microsoft Teams governance settings.
It allows administrators to perform a range of tasks, including but not limited to management and control of:
- Teams users and licenses
- Access to Teams features
- Policies for users, apps, guests, phone settings etc.
- Network and device compliance
- Phone system and calling capabilities
- User and network issues
- Teams usage and activity reports
You may have also heard the term “Teams Admin Console”, which is an older admin portal that was replaced by the Teams Admin Center. The old Teams Admin Console was focused mainly on managing voice and phone system capabilities, while the Teams Admin Center provides a more comprehensive set of administrative setting options. The Admin Console is still available for administrators to use, but Microsoft is strongly encouraging users to transition to the Teams Admin Center as it provides a more up-to-date and streamlined administration experience.
In order to access Microsoft Teams Admin Center at the URL admin.teams.microsoft.com, you need to fulfill certain requirements.
Microsoft 365 or Office 365 subscription
You need to have an active Microsoft 365 or Office 365 license to use Teams and the Teams Admin Center.
Permission to access the MS Teams Admin Center
Your account needs to have the appropriate permissions to access the MS Teams Admin Center, i.e. the Global administrator or Teams service administrator role.
Some administrative tasks may require additional resources or systems to be available, such as an active phone system.
Teams Admin Center Login
Teams Admin Center URL
Follow this link to access the Teams Admin Center login: https://admin.teams.microsoft.com/
People often confuse the correct URL with this one: admin.microsoft.teams.com – so make sure to bookmark the correct version in your browser!
Login to Teams Admin Center
First, you’ll need to select your Teams Admin account and enter your password.
If your account has the appropriate permissions, you will be taken directly to the Teams Admin Center dashboard.
If you do not have the necessary permissions for the login, you will receive an error message and may need to contact your organization’s IT department to set up your account correctly.
Please note that the login process may vary depending on your organization’s setup and configuration. If your organization uses single sign-on (SSO), you may need to use a different URL or access the Teams Admin Center through the Microsoft 365 admin center at https://admin.microsoft.com/.
Manage Microsoft Teams Settings for your Company
All Teams admin settings in one place:
Edit Team Profile Properties
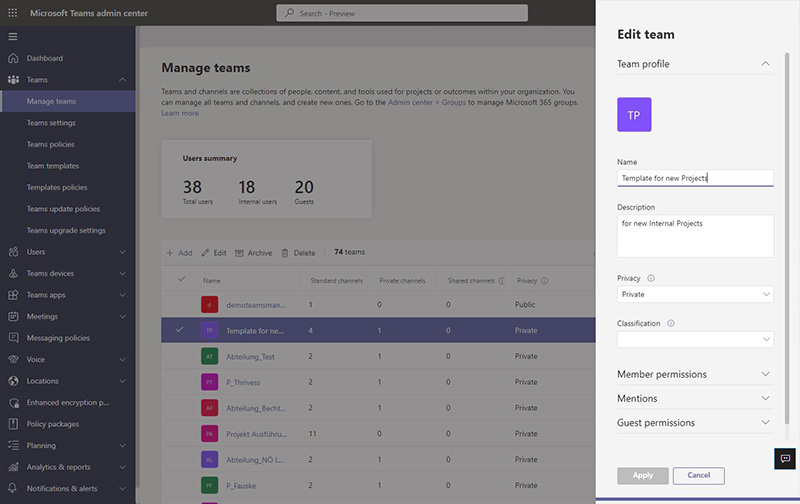
Under the menu option “Manage teams”, you will find settings for team profile properties. Here you can edit the team name and description as well as the privacy setting (public / private team).
In addition, you can activate or deactivate…
- team member permissions for messages, channels, apps, tabs, connectors
- mentions of team and channel name in messages
- guest permissions for adding, editing, deleting channels
- “fun” settings for gifs, stickers, memes and custom memes
Tools and Apps Management for Teams
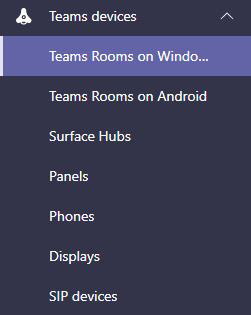
Under the „Teams devices” setting, you can find the following options.
Teams Rooms on Windows
This setting allows you to manage and troubleshoot your conference room equipment such as consoles, microphones, cameras and displays that run on Windows. You can configure settings, view activity information, set up alerts and perform diagnostics to help with troubleshooting.
Teams Rooms on Android
This setting is similar to the above but is specifically for conference room equipment that runs on Android devices. You can control and manage your Teams certified Android devices across your organization, create and upload configuration profiles to make changes, set up alert rules, and apply updates for each device.
Surface Hubs
Surface Hubs are all-in-one digital whiteboards, meeting platforms, and collaborative computing devices that allow teams to work together seamlessly. As a Teams administrator, you can manage these devices and ensure they are set up correctly for your organization’s needs.
Panels
Panels are devices placed outside meeting rooms that display information about room availability, reservations, and room names. As an IT administrator, you can manage these devices and ensure they are configured correctly.
Phones
This setting allows you to manage Teams certified phones throughout your organization. This includes user phones, common area phones, and conference phones. You can create configuration profiles for each type of phone, change settings, set up alerts, and apply software updates.
Displays
This setting allows you to manage displays in your organization. You can create configuration profiles to change settings, set up alert rules, and apply updates for each type of device.
SIP devices
This setting is for Session Initiation Protocol (SIP) devices, which are a cost-effective option for cloud phone service. You can control and manage Teams certified SIP devices across your organization, and they act as a Teams endpoint. You can set up inbound call forwarding to the user’s SIP device, and a user in a call can put the call on hold to make or receive other calls. A SIP device user can also conference two calls.
For more information, visit Microsoft’s article on Device Management in Microsoft Teams.
Under “Teams apps”, you can configure the following settings:
Manage apps
This setting allows you to control which apps are available to users in your organization by blocking or allowing them. You can also upload and approve custom apps. Once you have managed the apps, you can use app permission and app setup policies to customize what apps are available for specific users in your organization’s app store.
Additionally, you can manage your app subscriptions from this page.
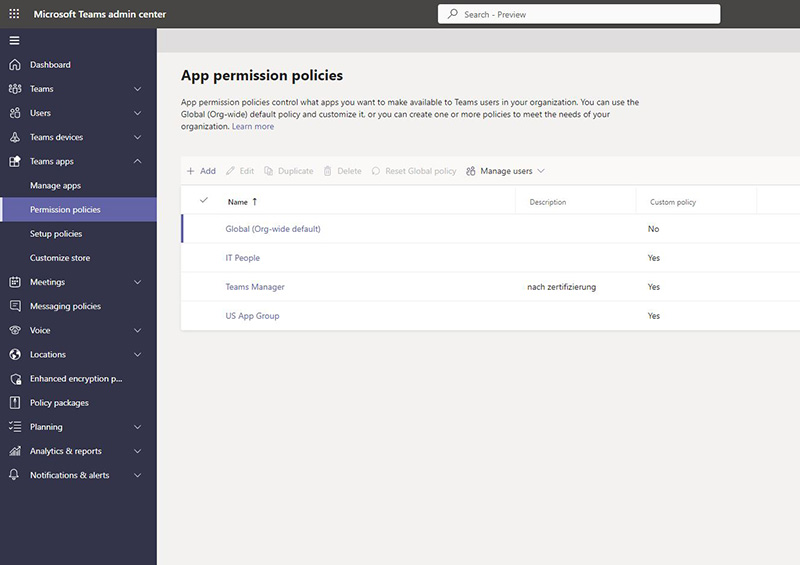
Permission policies
App permission policies control which apps are made available to Teams users in your organization. You can customize the default Global (Org-wide) policy or create one or more policies that meet your organization’s needs.
Setup policies
App setup policies determine how users can access apps in the Teams app. You can either use the default Global (org-wide) policy and adapt it, or create new policies that are specific to certain users in your organization.
Customize store
This setting allows you to personalize the Teams app store by adding your organization’s logo, logomark, and custom color or background. You can preview your customization changes before applying them.
Grant access to people outside of your organization
In the “Users” section of the navigation menu, you can find the settings for “Guest access” and “External access”.
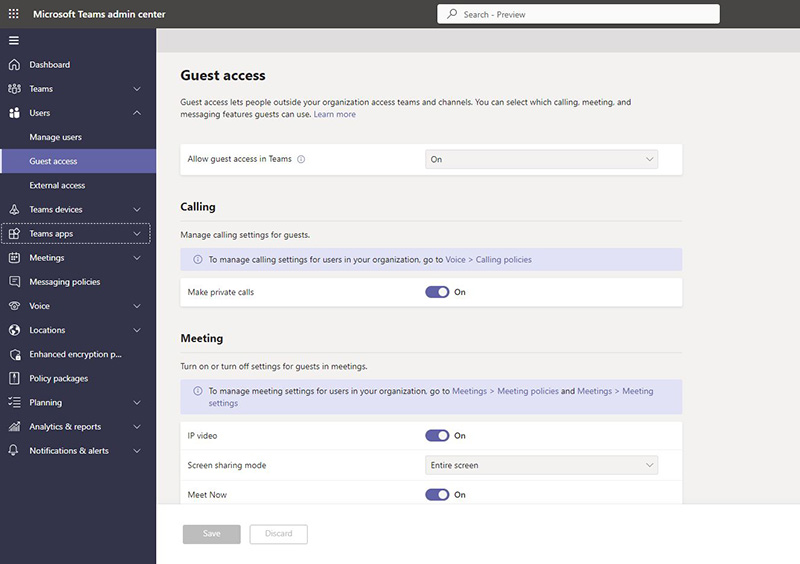
As we discussed in other blog posts, the difference between these two options for collaborating with people from outside your organization in your tenant is vital.
In short, external access is optimal for only sharing files, while guest access allows guests a wider range of actions in your Teams environment.
In these locations in the Team Admin Center, you can activate or deactivate both external and guest access. For more detailed information about the benefits and risks as well as deep dives into the different settings, take a look at these blog posts:
- Microsoft Team guest access – adding guests to Microsoft Teams
- Enable guest access for Microsoft Teams
- Block guest access for specific teams
- Microsoft Teams: default guest permissions
- Adding guests to Microsoft Teams
Manage Teams with Policies
Under “Teams”, go to “Teams policies” for settings on private and shared channels.
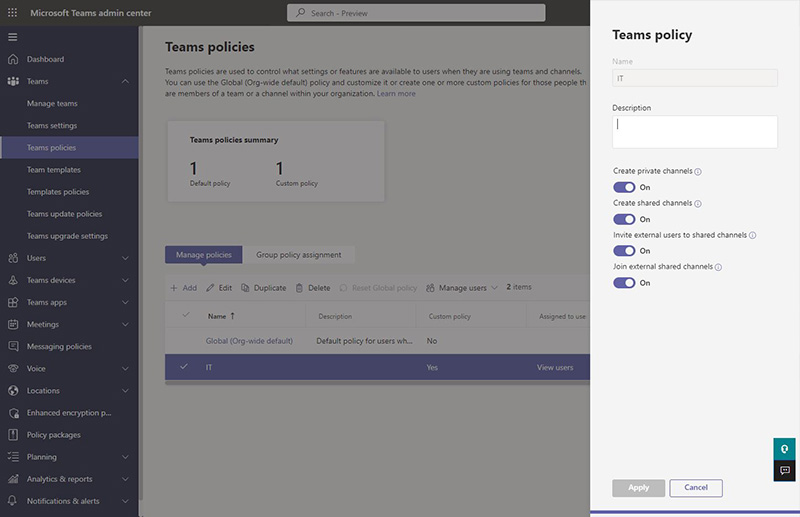
As a Teams administrator, you can use Teams policies to control the settings and features that users can access while using Teams and channels. You can either use the Global (Org-wide default) policy and make changes to it, or create new policies that are specific to certain teams or channels within your organization.
Available options include activating or deactivating…
- the creation of private channels
- the creation of shared channels
- the option to invite external users to shared channels
- the possibility to join external shared channels
With Teams Manager, you can set up a request and approval process for new channels as well as for teams, in order to keep control and prevent the uncontrolled creation of channels. Take a quick look:
Monitor and Manage Call Quality
Another interesting part of the Teams Admin Center can be found under “Analytics & Reports” in the navigation: the “Call quality dashboard”. The link will lead you directly to https://cqd.teams.microsoft.com/.
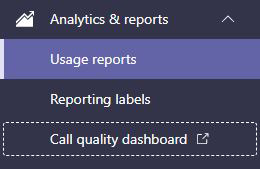
The Call Quality Dashboard (CQD) is a tool for Teams administrators, Skype for Business admins, and network engineers to display and analyze call and meeting quality data for Microsoft Teams, Skype for Business Online, and Skype for Business Server 2019 at the organization-wide level.
CQD allows you to monitor the performance and quality of your network to improve the call quality of your users. It offers near-real-time data, and it includes reports of call quality metrics, such as overall call quality, server-client streams, client-client streams, and voice quality SLA.
You can use the Call Quality Dashboard to help identify and troubleshoot issues that affect users, and also to analyze call quality and reliability within a user’s building. To use building or endpoint-specific views in CQD, an admin must upload building or endpoint information on the CQD Tenant Data Upload page.
Managing Teams can be a colossal task. Want to make this task simpler?
User Management: The different Admin Roles in Teams
There are five different administrator roles that can be assigned to users in an organization in order to maintain, manage and control the Teams environment. Each of these administrator roles has different levels of access and responsibility within Teams, and organizations can assign these roles based on the needs and responsibilities of their IT staff.
In order to assign these admin roles, go to the Azure Active Directory in the Azure portal at https://portal.azure.com and access the user management.
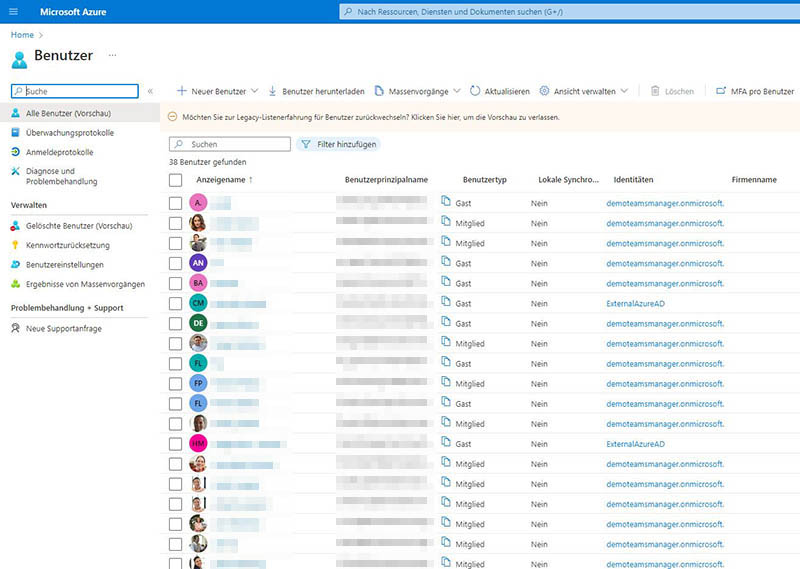
Teams Administrator or Teams Service Administrator
A Teams Administrator has the ability to manage users, policies, and other aspects of the Teams deployment. This role is typically assigned to IT professionals and administrators who are responsible for managing Teams in the organization.
Teams Communications Administrator
A Teams Communications Administrator has specialized skills and knowledge for managing and configuring the calling and meeting capabilities in Teams. This role is responsible for setting up and managing telephony and audio conferencing in Teams, as well as configuring calling policies and response groups.
Teams Communications Support Engineer
A Teams Communications Support Engineer is responsible for providing advanced technical support and troubleshooting issues with the calling and meeting capabilities in Teams. This role is responsible for supporting end-users with their Teams telephony and audio conferencing needs, as well as resolving technical issues.
Teams Communications Support Specialist
A Teams Communications Support Specialist is a more junior role that provides support for the calling and meeting capabilities in Teams. This role is responsible for providing basic support and assistance to end-users, such as resetting passwords and answering frequently asked questions. Basically, first-level support for MS Teams.
Teams Device Administrator
A Teams Device Administrator is responsible for managing and deploying Teams devices, such as Teams Rooms, Surface Hubs, and Teams Phones. This role is responsible for setting up and configuring Teams devices, as well as managing device inventory and providing technical support for Teams devices.
With so many different roles and settings options, managing Teams can become quite complex. Looking for a simpler solution? Teams Manager has you covered, with easy-to-use administration and governance features.
Best Practices for the Microsoft Teams Admin Center
Microsoft Teams & Skype for Business Admin Center
Skype for Business Admin Center has been incorporated into the Microsoft Teams Admin Center for some time now. The Teams Admin Center is now the primary management portal for both Teams and Skype for Business, and it allows administrators to manage both services from a single location.
While Microsoft has been migrating users from Skype for Business to Teams, there are still organizations that continue to use Skype for Business, and the Teams Admin Center provides a unified management experience for both services. In the Teams Admin Center, administrators can manage user accounts, configure policies, manage meetings and conferences, and perform other administrative tasks for both Teams and Skype for Business.
Here are some best practices to keep in mind for the administration of Skype for Business in the Teams Admin Center:
Understand the coexistence modes
Teams and Skype for Business can run in different coexistence modes, which determine how the two services work together. As an administrator, you should understand the coexistence modes and choose the one best suited for your organization.
Plan your migration
If you are planning to migrate from Skype for Business to Teams, make sure to plan your migration thoroughly. Best practices include moving users in stages, setting up coexistence modes, and testing the migration process before rolling it out to your entire organization.
Keep your clients updated
Make sure that your Skype for Business clients are up to date and fully patched. Microsoft regularly releases updates to fix bugs and security issues, so ensuring your clients are up to date can help ensure that everything works smoothly.
Configure policies and settings
The Teams Admin Center allows you to configure a wide range of policies and settings not just for MS Teams, but also for Skype for Business, including conferencing policies, voice policies, and presence policies. Make sure to configure these policies and settings to meet the needs of your organization and users.
A governance tool for easier administration?
Download Teams Manager directly in the Teams app store!
Microsoft Teams Phone System Administration
The Teams Admin Center also provides a range of admin tools and settings for configuring and managing the phone system of an organization.
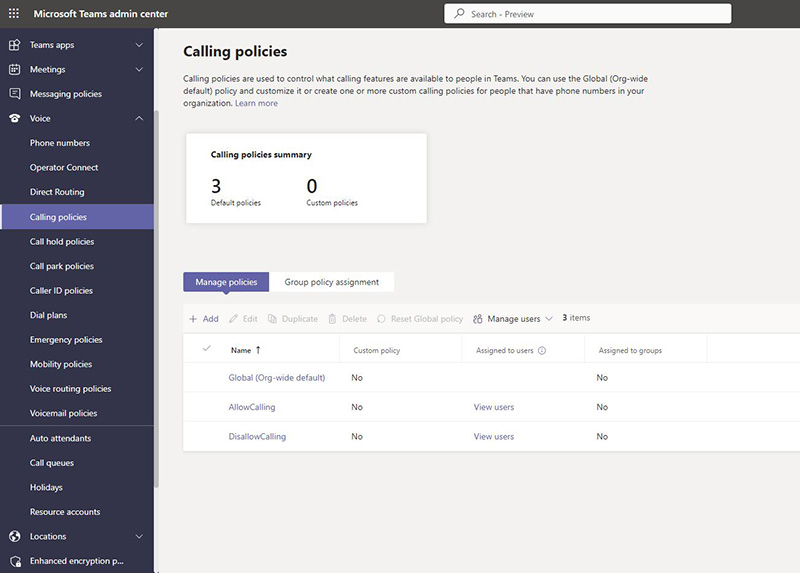
To set up the phone system in Microsoft Teams, you will need to configure several different components.
Phone numbers
You can assign phone numbers to users in your organization so that they can make and receive calls using Teams. The Teams Admin Center allows you to assign phone numbers and configure other settings related to phone numbers, such as call forwarding and voicemail.
For this option to become available, you need to purchase a calling plan for Microsoft Teams.
Call routing
You can set up call routing to ensure that calls are routed to the appropriate users or departments in your organization. The Teams Admin Center allows you to configure call queues, auto attendants, and other call routing settings.
Policies
You can configure policies that control various aspects of the phone system, such as call forwarding, call transfer, and voicemail. The Teams Admin Center enables administrators to configure these policies and apply them to individual users or user groups.
Integration with third-party systems
You can also integrate your organization’s phone system with third-party systems, such as contact center applications or CRM systems.
Best practices for managing your Teams phone system in Teams Admin Center include:
Using call analytics to troubleshoot issues
The Teams Admin Center includes call analytics tools such as the Call Quality Dashboard that can help you monitor and troubleshoot issues with the phone system.
Testing new configurations before rolling them out
As with any other tool, before you make any changes to your phone system configuration, make sure to test the changes in a test environment. This can help you identify issues or unintended consequences before rolling out the changes to and potentially disrupting your entire organization.
Microsoft Teams Chat Admin
A Microsoft Teams chat admin is a role in MS Teams that allows users to manage chat and messaging settings for a specific set of users or groups within an organization. A chat admin can configure policies and settings related to chat and messaging.
The Teams Admin Center does not have a specific role for chat admin, but some of the chat and messaging settings can be configured through the Teams Admin Center. For example, administrators can configure messaging policies that control settings like message retention, external access, and read receipts.
In addition to the Teams Admin Center, chat admins can also manage messaging policies and settings through the Teams PowerShell module, which allows for more granular control over Teams settings and configuration.
Change Guest Account to Admin
You can change a guest account in Microsoft Teams to an admin for the Microsoft Teams Admin Center, thus assigning the role of Teams admin to an external guest. However, there are a few things to keep in mind and an important caveat.
- First, of course, the guest account needs to be added as a member of the team in the Teams app.
- The guest account must then be assigned the “Teams administrator” (also sometimes called “Teams service administrator”) role in the Azure Active Directory (AAD).
Once these steps are completed, the guest account will have the necessary permissions to access and manage the Microsoft Teams Admin Center.
Time needed: 5 minutes
To assign the “Teams administrator” role to a guest account, you will need to follow these steps:
- Go to Azure Portal
Log in to the Azure portal (https://portal.azure.com) with your AAD administrator credentials.
- Go to Azure Active Directory
Navigate to the “Azure Active Directory” service.
- Select guest account
Select “Users” from the left-hand menu, and then select the guest account that you want to make an admin.
- Add role assignment
Click on “Directory role” on the left-hand menu, and then click on “Add role assignment”.
- Add Administrator role
In the “Add role assignment” pane, select “Teams service administrator” as the role, and then click on “Add”.
It may take some time for the role assignment to take effect.
The guest account now has the necessary permissions to access and manage the Microsoft Teams Admin Center.
Please note: Granting admin access to a guest account should be done with caution and only when absolutely necessary, as it can increase the security risks of your Teams environment.
FAQ: Microsoft Teams Admin Center
It is no small task to manage Microsoft Teams! You need to set up the environment, configure settings, manage users and permissions, manage channels, and monitor and troubleshoot issues. For this, you can use the Teams Admin Center or PowerShell.
For more details, check out our blog post about the possibilities with Teams Governance and Teams administration.
There are five different admin roles in the Teams Admin Center: Teams Administrator, Teams Communications Administrator, Teams Communications Support Engineer, Teams Communications Support Specialist, and Teams Device Administrator. All these roles have different levels of access and permissions in managing Teams and related features, and different requirements for the users fulfilling them.
Please see the detailed explanation in the blog post above for more details for the respective requirements and tasks.
You can get to the Teams Admin Center by following one of these two paths:
• Open the URL https://admin.teams.microsoft.com/ and log in with your global admin credentials.
• Go to the Microsoft 365 admin center at https://admin.microsoft.com. Click on “Show all” at the bottom of the left-hand menu and select “Teams” under the “Admin centers” section.
Please note that you will need to have admin privileges in Microsoft 365 to access the Teams Admin Center.
There are many resources available to learn more about the Teams Admin Center and how to manage Microsoft Teams effectively. Here are a few places where you can get started:
• Microsoft Teams documentation
The official Teams admin documentation provides in-depth guidance on how to use the Teams Admin Center. You can access it at https://learn.microsoft.com/en-us/microsoftteams/.
• Microsoft Teams community
The Microsoft Teams community is a great place to connect with other Teams administrators and get help with your questions. You can join the community at https://techcommunity.microsoft.com/t5/microsoft-teams/ct-p/MicrosoftTeams.
• Microsoft Learn
Microsoft Learn provides free training courses on a wide range of Microsoft products, including Microsoft Teams. You can access the Microsoft Teams training at https://learn.microsoft.com/en-us/training/browse/?products=office-teams.
• Microsoft Answers
You can also try the Microsoft Answers forum if you are looking for support with technical questions about Microsoft Teams. It can be found here: https://answers.microsoft.com/de-de/msteams/
• YouTube
And lastly, there are many YouTube channels and videos dedicated to teaching people how to use the Teams Admin Center. A quick search on YouTube will provide many options to choose from.
You can access the Teams Admin Center at the URL admin.teams.microsoft.com.
Conclusion and Summary for the Management of MS Teams
The Teams Admin Center is the central hub for managing Teams, users, apps, calls, devices, policies, and other settings. There are five different admin roles in the Teams Admin Center, each with different levels of access and permissions. Best practices for managing Teams include setting up the environment correctly, configuring policies and settings, managing users and channels, and monitoring for issues that may arise. Make sure to prepare a strong strategy to keep control of your Teams environment.
Another option to manage Microsoft Teams and get reports on your governance efforts is Teams Manager’s Governance Dashboard. Here is a quick overview:
Microsoft Teams Admin Center – or Teams Manager!
If you’re looking for an easier and more convenient way to manage Microsoft Teams, check out Teams Manager. Teams Manager is a powerful app that allows you to manage Teams and settings in a single interface, making it easy to configure policies, templates, requests, governance, and guest access.
With Teams Manager, you can streamline your Teams management process and save time and effort. Whether you’re new to Microsoft Teams or an experienced administrator, Teams Manager can help you get the most out of Teams.
For a more efficient way to manage Microsoft Teams, take a look at Teams Manager!

CEO and Governance Expert – Christian Groß is a Teams expert from the very beginning. In the last 4 years he developed 6 Teams Apps, built up his own service company and additionally founded the largest German-speaking Teams conference.


